Introduction
When your garage door needs attention in Palm Beach County, Florida, a clear repair process can turn a stressful situation into a manageable one. Repairs often start with unusual noises, uneven movement, or a door that refuses to open right when you are rushing out. Because our coastal environment accelerates wear on hardware and electronics, knowing what happens during a professional repair visit helps you make informed decisions and get back to normal quickly. If you want dependable help tailored to local conditions from Boca Raton to Jupiter, begin by arranging a professional evaluation through a trusted garage door service that follows a safety-first, step-by-step approach.
This guide walks through every stage of a quality repair: initial assessment, safety stabilization, component diagnosis, corrective work, and final verification. You will also learn when repair gives way to replacement, how to prepare your garage for a technician, and what to do after the visit to maintain smooth operation.
Step 1: Intake and Symptom Review
Repairs begin with your description of the symptoms. Share when the issue started, whether it came on suddenly or gradually, and any noises or flashing lights from the opener. Mention recent weather events, as wind and rain can jostle sensors, corrode hardware, or introduce debris into tracks. Clear communication shortens diagnostic time and focuses attention where it is most needed.
A technician will observe at least one full open-close cycle, noting speed, balance, noise, and sensor behavior. They will also check whether the problem is intermittent, which can indicate loose connections or temperature-sensitive components.
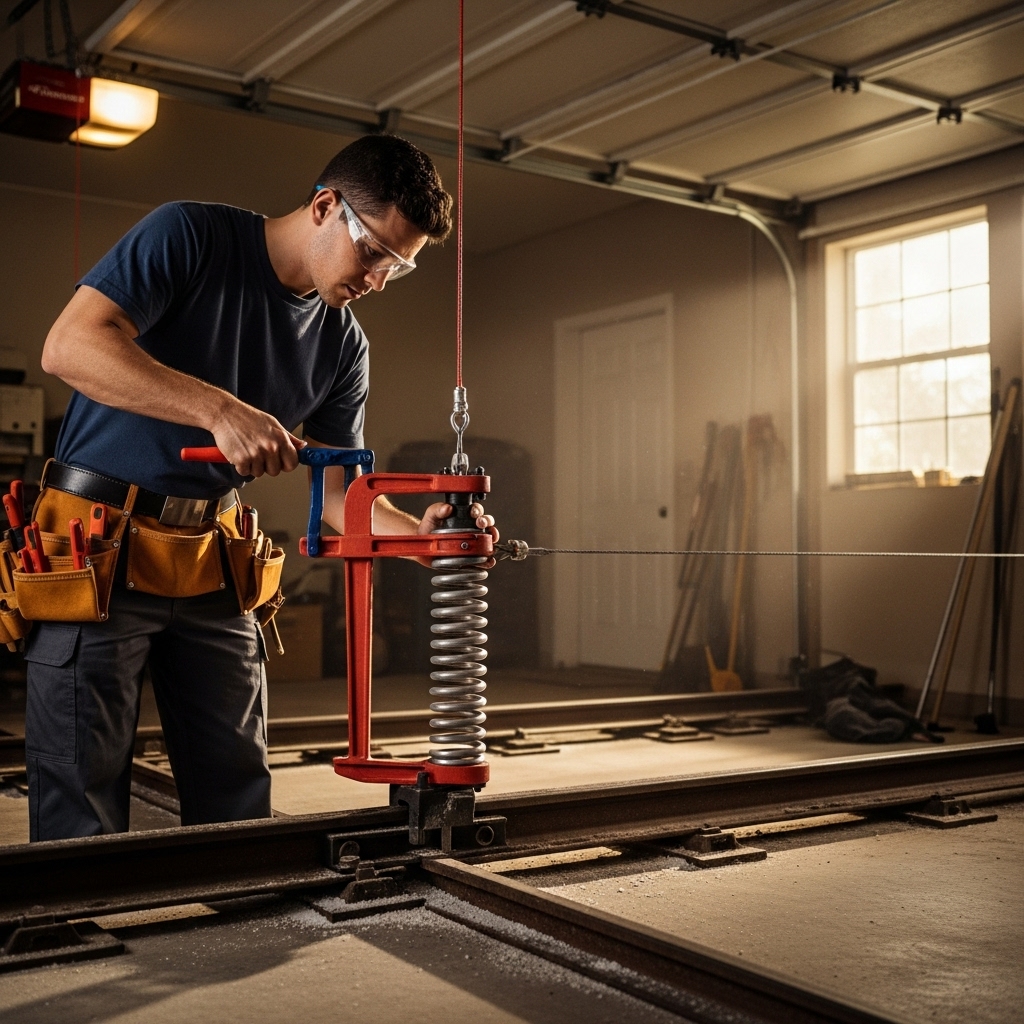
Step 2: Safety Stabilization
Before touching anything, the technician will secure the area. Power to the opener may be disconnected, and the door may be clamped in place to prevent movement. This is especially important if there are signs of spring or cable failure. Stabilization eliminates the risk of the door dropping unexpectedly and protects the technician, household members, and vehicles.
In attached garages, establishing a safe space is crucial because door movement can affect walls and ceilings. Professional teams bring the right clamps, bars, and procedures to lock the system safely for diagnostics.
Step 3: Mechanical and Electrical Diagnostics
Diagnosis proceeds systematically from the door panels and hardware to the opener and controls. The technician inspects rollers, hinges, tracks, brackets, springs, and cables for wear, cracks, frays, and alignment issues. They check track plumb and spacing and look for signs of rubbing or binding. On the electrical side, they evaluate opener mounts, drive system tension, sensor alignment, and wiring integrity. Error codes from the opener can pinpoint travel or force faults or communication problems with accessories.
Corrosion signs are taken seriously in coastal areas. Rust on springs, pitting on tracks, and seized bearings in rollers often explain noise and resistance. The diagnostic goal is to identify root causes rather than masking symptoms with force adjustments.
Step 4: Presenting Options and Getting Approval
Once the cause is clear, the technician presents options. For instance, a loud door may need balanced spring tension and upgraded rollers, while frequent reversals often point to alignment and sensor issues. If multiple components are near the end of their life, a grouped repair plan can restore harmony across the system. When wind-load compliance is in question, panel or track upgrades may be recommended to match Palm Beach County requirements.
Transparency builds trust. You should understand what will be done, which parts are involved, and the expected outcome. Clear communication sets expectations for performance and helps you plan for future maintenance.
Step 5: Performing the Repair
With approval, the technician proceeds. Common repairs include replacing worn rollers, adjusting or replacing springs, aligning tracks, installing new cables, correcting opener travel limits, and recalibrating force settings. For noisy systems, nylon rollers and fresh lubrication can make a dramatic difference. If panels are damaged, sectional replacement restores both function and appearance.
During the repair, each fastener is checked, and brackets are re-torqued to manufacturer specifications. Technicians use calibrated tools to set spring tension and verify cable seating in the drums. Attention to detail at this stage prevents future callbacks and keeps your door quiet and steady.
Step 6: Safety Systems and Functional Testing
After mechanical work, the technician tests safety features. Photo eyes are cleaned and aligned, and both non-contact and contact reversals are verified. The door is cycled multiple times to confirm smooth travel without binding. Balance is checked by disconnecting the opener and positioning the door at mid-height; it should hold steady. If not, spring tension is fine-tuned until balance is correct.
The opener’s travel and force settings are set to the manufacturer’s recommended range. Too much force can hide a problem and reduce safety, while too little leaves the door stuck or reversing prematurely. Calibration ensures safe operation for people, pets, and vehicles.
Step 7: Corrosion Mitigation and Protection
In Palm Beach County, rust and corrosion are persistent concerns. A thorough repair includes cleaning tracks to remove salt and grit, applying appropriate lubricant to moving joints, and protecting exposed metal. Damaged weather seals are replaced to keep wind-driven rain and sand out, and bottom seals are verified for uniform contact along the threshold.
Proactive protection is a hallmark of quality work. By addressing environmental stressors, the technician extends the life of the repair and helps the entire system perform more reliably between service visits.
Step 8: Final Walkthrough and Education
Before wrapping up, the technician demonstrates operation, shows how to use the manual release, and explains how to perform basic monthly checks. You should leave the visit knowing how to keep photo eyes clean, what a normal sound profile is, and which early signs deserve attention. Documentation of parts, adjustments, and observations may be provided for your records.
Education turns a repair into long-term reliability. With a few simple habits—listening for changes, wiping tracks, and testing reversal—you can enjoy the benefits of the repair for years.
When Repair Becomes Replacement
Sometimes the diagnostic process reveals that replacement is the more practical route. Severely bent or rusted tracks, multiple cracked panels, or an opener without modern safety features can make repair uneconomical or noncompliant with local wind requirements. Upgrading to a wind-rated door with reinforced tracks and hardware aligns your system with Palm Beach County standards while improving security and quietness.
Replacing older components does not erase the value of past repairs; it builds on them by eliminating weak links and harmonizing performance across the door, hardware, and opener.
How to Prepare for a Repair Visit
Clear the area around the door and tracks, move vehicles out, and remove storage bins or tools that block access. Note any intermittent symptoms and the times of day they occur—heat and humidity can affect performance and help pinpoint issues. If you have multiple remotes or a keypad, have them on hand for testing and reprogramming if needed.
Preparation shortens the visit and ensures that the technician can perform full-cycle testing without obstacles. A little organization accelerates the path back to normal operation.
Aftercare and Ongoing Maintenance
Following a repair, plan a short follow-up routine. Over the next week, listen during operation and watch for even movement. Clean sensor lenses and wipe tracks lightly if dust appears. Add a thin film of garage-door-rated lubricant to hinges and roller bearings if recommended. Keep a log of any observations to discuss at a future tune-up.
In our coastal climate, schedule periodic inspections to catch corrosion and wear early. Consistency keeps small issues from becoming new repair calls.
FAQ
Q: Why did my door suddenly get loud? A: Noise often signals worn rollers, dried lubrication, misalignment, or corrosion in bearings. Repairs typically focus on restoring smooth rolling surfaces and alignment, not just damping sound.
Q: The door will not stay halfway open when disconnected. What does that mean? A: That indicates balance problems, usually tied to spring tension. Correcting balance protects the opener and reduces risk of sudden movement.
Q: Can I fix a broken spring myself? A: No. Spring tension is dangerous without proper tools and training. Professional replacement and calibration are essential for safety.
Q: Why does my door reverse with nothing in the way? A: Misaligned or dirty photo eyes, binding tracks, or excessive force sensitivity can cause nuisance reversals. Cleaning sensors and realigning tracks often resolves the issue.
Q: How long does a typical repair take? A: Many repairs complete in one visit, depending on parts and complexity. Diagnostics, parts replacement, and full safety testing are included in that window.
Q: Will corrosion come back after you clean it? A: Coastal air continually introduces salt, so protection is ongoing. Regular cleaning, proper lubrication, and corrosion-resistant components dramatically slow recurrence.
Schedule Professional Help in Palm Beach County
A thoughtful repair process blends careful diagnostics, safety-first procedures, and durable solutions tailored to Florida’s coastal environment. When local experts handle the details—from balancing and track alignment to sensor calibration—you get reliable performance and peace of mind. If you are ready to restore smooth, quiet operation and reinforce safety, arrange a professional garage door service and get back to a dependable daily routine.