Introduction: A Florida-Focused Guide to Replacing Your Garage Door
Replacing a garage door in Florida is not the same as replacing one in a calmer climate. Between hurricane-force winds, high humidity, salt-laden coastal air, and strict building codes, your approach needs to be methodical and Florida-specific. Whether you are upgrading for storm safety, boosting curb appeal, or improving daily convenience, this how-to guide walks you through planning, selecting, and installing a door that meets state requirements and stands up to the elements. If you decide you want expert support at any point, consider professional garage door replacement to ensure code compliance and reliable performance.
Before starting, review your local municipality’s building department guidelines and your HOA rules. Florida jurisdictions often require permits for door replacement because the door is part of your home’s wind-load resistance. Choosing an impact-rated or wind-rated system and properly anchoring hardware are not optional—they’re essential. This guide covers common tools, measurements, safety practices, and Florida-specific tips, plus what to watch for during setup and final testing.
Understand Florida’s Codes and Wind Ratings
Florida’s building codes focus heavily on wind-borne debris and uplift forces. In wind-borne debris regions and High Velocity Hurricane Zones (HVHZ), you’ll need a door tested and rated for specific pressures. Look for labels that indicate compliance with relevant Florida Product Approvals, and if you are in South Florida, check for stricter standards commonly associated with Miami-Dade or Broward acceptance. Manufacturers publish pressure charts for door sizes; use them to match your opening’s width and height with the correct model and reinforcement kits.
Beyond the door itself, compliance depends on the full system: tracks, jamb brackets, fasteners, hinges, struts, and anchoring into the structure. Proper fasteners (often stainless or hot-dipped galvanized) and correct spacing are critical for resisting wind loads. If you are replacing only the panels but reusing old tracks or hardware, make sure they are compatible and rated; mismatched components can undermine performance and may violate code.
Planning and Measuring the Opening
Start with accurate measurements. Record the width and height of the finished opening (not just the framing), plus the headroom, backroom, and sideroom. Headroom influences spring configuration and opener placement; backroom determines whether a standard track radius will fit without interfering with ducts or garage storage. Florida garages sometimes include hurricane struts, additional bracing, or concrete lintels that reduce headroom, so measure carefully and note obstructions like fire sprinklers or attic pull-down ladders.
Measure the jamb condition too. Many Florida homes have masonry openings with wood jambs or direct-to-concrete fasteners. Note any rot, termite damage, rust, or corrosion—common in humid and coastal areas. Plan to replace deteriorated wood or add composite or PVC trim that won’t absorb moisture. Properly sealing the jambs and threshold against wind-driven rain helps keep your garage dry during storms.
Choosing Materials and Finishes for Florida
Material choice affects longevity in humid, salty air. Steel doors with high-quality, baked-on finishes resist corrosion better than bare or poorly finished steel. Look for galvanized steel with a robust paint system and consider stainless hardware upgrades near the coast. Fiberglass and aluminum can be viable options, but they must still meet wind-load requirements and be paired with appropriate reinforcement. Insulated doors (often polystyrene or polyurethane core) help with temperature stability and noise reduction and can minimize condensation issues that lead to corrosion.
Windows add light but can be a vulnerability in storms. If you choose windows, ensure they are impact-rated or have approved protection methods. Pay attention to how window placement interacts with struts; some configurations require additional reinforcement that can affect headroom and installation steps.
Tools and Supplies You Will Need
- Measuring tape, level, framing square, and plumb line
- Hammer drill (for masonry), drill/driver, and appropriate bits
- Stainless or hot-dipped galvanized fasteners and concrete anchors where required
- Winding bars (for torsion springs), vice grips, adjustable wrench, sockets
- Safety gear: eye protection, gloves, hard hat when working under tracks/panels
- New tracks, hinges, rollers, brackets, and spring system specified by the door manufacturer
- Weatherstripping, bottom seal, threshold seal or threshold adhesive (if applicable)
- Non-silicone garage door lubricant formulated for humidity and salt exposure
- Sealant compatible with masonry/wood and UV-resistant exterior caulk
Safety First: Springs and Structural Anchoring
Garage door springs store significant energy. If you are not trained on torsion spring winding, hire a pro. Extension springs can also be dangerous without containment cables and correct tensioning. For any DIY effort, strictly follow manufacturer instructions, use proper winding bars, and never substitute screwdrivers or makeshift tools. Disconnect power to the opener and clamp the door/track before working on any moving parts.
Anchoring is as important as spring handling. Florida installations typically require anchoring into concrete or solid framing using approved fasteners and spacing. Avoid corrosion-prone hardware; it can weaken over time, especially near the coast. Verify that jamb brackets and flag angles are aligned and fully secured; misaligned or under-fastened hardware is a weak point in high winds.
Removing the Old Door
- Disconnect the opener and lock the door in place with clamps. Unwind torsion springs safely or relieve tension on extension springs per manufacturer procedures.
- Remove the opener arm from the door and take off the lift cables. Keep hardware organized for reference, but plan to replace with new components supplied with the door.
- Starting with the top section, remove hinges and rollers and carefully lower each panel. Keep your body clear of pinch points.
- Remove old tracks, spring assemblies, and brackets. Inspect the header, jambs, and floor for damage or corrosion.
- Clean and prepare surfaces. Patch holes as needed, replace compromised wood, and ensure the opening is plumb and square.
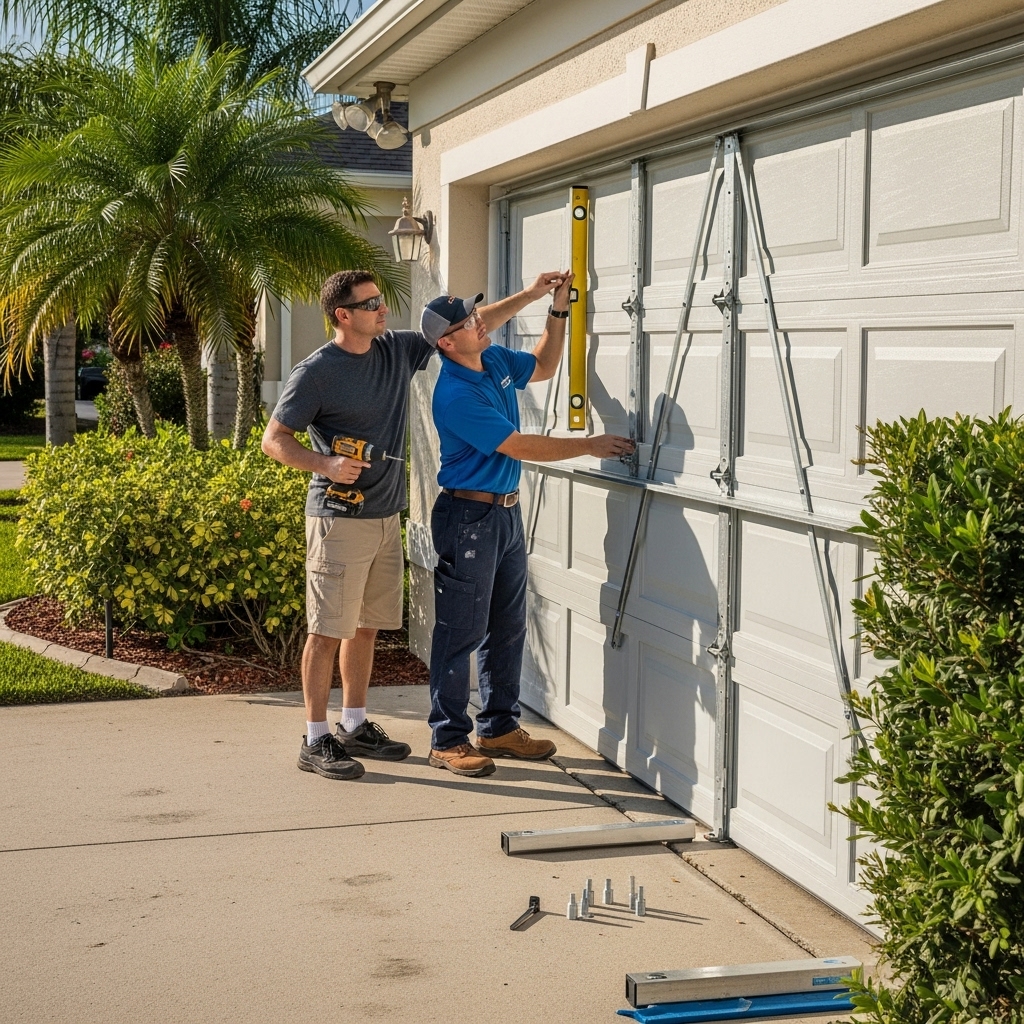
Installing New Tracks and Hardware
Begin by laying out the bottom section in the opening. Check level on the floor; Florida slabs sometimes have a pitch for drainage. If the floor is uneven, use a flexible bottom seal or threshold to minimize gaps. Attach hinges and rollers to the bottom section per the door’s instructions, then set the section, shimming as needed to keep the section level and plumb.
Install vertical tracks aligned with the section’s rollers, ensuring an even reveal on both sides. Secure bracket fasteners into solid material—masonry anchors or embedded wood—at specified intervals. Add the next door section, connect hinges, and continue stacking. Florida-rated doors often require metal struts across each section; do not skip these. They add rigidity and help the door resist wind pressure.
Spring Systems, Lift Cables, and Balance
With sections stacked and vertical tracks secured, install the torsion tube, drums, and center bearing. Make sure cable drums correspond to the track configuration (standard lift, high lift, or low headroom). Route lift cables neatly, avoiding twists. Wind torsion springs using proper bars and follow the manufacturer’s turn count carefully. Once the springs are set, remove clamps and test door balance by lifting halfway. A properly balanced door should stay in place or move very slowly. If it drops or shoots up, adjust spring tension in small increments.
Attach flag angles and horizontal tracks, verifying the correct track radius. In Florida garages, ducts or hurricane shutters stored overhead can crowd the ceiling; maintain required clearances for safe operation. Ensure roller to track alignment is smooth with no binding. Tighten all set screws securely—and recheck after the first week of operation due to settling.
Weather Sealing and Corrosion Resistance
Install the bottom seal and retainer, ensuring the seal compresses evenly across the floor. Add side and top weatherstripping, keeping a light but continuous contact with the door. Apply UV-resistant exterior caulk where trim meets masonry to block wind-driven rain. Consider a garage threshold system at the floor if your slab has minor irregularities or if wind-blown water has been a problem. Finally, lubricate all moving metal parts with a garage-rated lubricant suitable for humid environments. Wipe away excess to avoid attracting sand or debris.
Opener Integration and Safety Features
Mount the opener per instructions, minding backroom and headroom. Ensure photoelectric sensors are at the correct height and pointed directly at each other. Test force settings so the door reverses upon light contact and when the beam is interrupted. In storm-prone regions, consider a battery backup and reinforced opener brackets. Use a sturdy perforated angle or opener mount approved by the door maker to prevent flexing during operation.
Permits, Inspections, and Documentation
Many Florida jurisdictions require a permit and a final inspection. Keep the door’s labels, product approvals, and installation manual handy for inspectors. Photographs of anchor locations and fastener types can help. If your HOA requires approval, submit the model, color, and window options ahead of time to avoid delays. Retain all documentation; it may be useful for insurance or future resale.
Common Mistakes to Avoid
- Reusing incompatible tracks or springs with a new door model
- Under-fastening brackets into weak material or corroded anchors
- Skipping reinforcement struts on wide doors
- Failing to seal gaps around jambs and header against driven rain
- Ignoring uneven slabs that create bottom seal gaps
- Incorrect spring winding count leading to poor balance and opener strain
When to Call a Professional
DIYers can handle many parts of a replacement, but certain situations call for experience: torsion spring handling, high-lift or low-headroom conversions, significant masonry repairs, or coastal corrosion mitigation planning. Mid-project surprises—like an out-of-square opening, a sagging header, or hidden termite damage—can turn a straightforward job into a complex one. At that point, a technician can quickly assess wind-load requirements, reframe as needed, and confirm code compliance. If you prefer a start-to-finish solution, a team that regularly works in Florida’s conditions can streamline permitting, installation, and inspection. Explore professional options for garage door replacement if you want the assurance of tested methods and materials tailored to your region.
Post-Installation Care in Florida
Once your door is operating smoothly, adopt a care routine tuned for humidity and storms. Every two to three months, wipe down metal parts with a damp cloth followed by a dry towel, then apply lubricant to hinges, rollers (if serviceable), and bearings. Rinse the exterior to remove salt spray, especially within a few miles of the coast. Inspect weather seals for brittleness or gaps; replace any worn segments before storm season. Check fasteners for corrosion and snugness, and re-torque set screws on drums and springs after initial break-in.
Before tropical storms or hurricanes, verify that locks and manual releases are working, reinforce with manufacturer-approved bracing if your system includes it, and clear the garage area so objects cannot collide with the door. After a storm, do a visual inspection of panels, tracks, and fasteners before operating the opener. If you see deformation or hear scraping, stop and call a professional for a safety check.
FAQ: Florida Garage Door Replacement
Q: Do I need a permit to replace my garage door in Florida?
A: In many jurisdictions, yes. Because the door is part of the wind-load path, local building departments often require a permit and an inspection to confirm rated components and proper anchoring.
Q: What wind rating should I choose?
A: It depends on your exposure, location, and door size. Consult local code requirements and the manufacturer’s wind-load charts. Homes in HVHZ or near the coast generally require higher ratings and specific reinforcement.
Q: Can I reuse my old tracks and springs?
A: Not usually. Different doors have different thicknesses, curve radii, and spring requirements. Reusing incompatible hardware can lead to performance issues and may violate code or void warranties.
Q: How often should I lubricate the door in Florida?
A: Every 2–3 months is a good baseline due to humidity and salt exposure. Increase frequency if you are directly on the coast.
Q: Are impact-rated windows necessary?
A: If you choose windows in a wind-borne debris region, look for impact-rated glazing or approved protection methods. Check local code and HOA guidelines.
Q: What if my slab is uneven?
A: Use a flexible bottom seal or a threshold system to close gaps. For significant slopes, consult a pro about custom seals or minor concrete work.
Next Steps for a Safer, Quieter Florida Garage
With the right plan, materials, and attention to code, your new door will operate smoothly and withstand Florida’s demanding climate. If you want an expert to handle measuring, permitting, installation, and final inspection, schedule professional garage door replacement and enjoy peace of mind that your home is ready for everyday use and storm season alike.